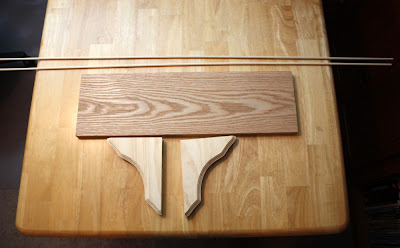
Materials you’ll need
1 - 1"x 8"x 2' red oak board
2 – 6”x 8” pine shelf brackets (with mounting hooks on back)
2 – 1/4”x 48” wood dowel rods
4 - 1 1/2" flat head screws
Tools needed
Drill & Bits
Screwdriver
Razor blade or a sharp knife
Wood glue
Fine grit sandpaper
Tape measure
Pencil


The shelf brackets are 1” wide so draw a line down the middle (1/2”) on the top, then measure from the back edge measure 2 1/8” make a X on the line, then measure 4 1/8” and make a X on the line, do this on both brackets. Now on the inside face of the shelf brackets measure 1” down from the top and 3 3/8” in from back and make an X, then measure 3” down and 2” in and make a X, then measure 5 1/8” down and 1 1/16” in and make a X, then measure 6 7/8” down and 3/8” in and make an X; do this to both shelf bracket, just remember to measure and mark the inside faces. Number one rule, measure twice drill once; I’ve learned to always double & sometimes triple check my measurements before I start to drill.
Now everywhere there’s are X you need to drill a pilot hole, the shelf pilot holes need to be drilled one size smaller that the screws and you need to drill all the way through. The top of the shelf bracket pilot holes will be the same bit size you use on the shelf but you only need to drill about a 1/2” into the wood. The holes for the shelf bracket faces are 1/4” drill bit, the size of the dowels, and you only drill about a 1/4” into the wood. A little tip; measure a 1/4” down the drill bit tip and wrap a piece on masking tape around the bit, now when you drill you’ll know when to stop.
Take your screws and attach the shelf to the shelf brackets, but do not tighten the screws down all the way. Measure your finished shelf from one dowel hole across to the other dowel hole and add 1/2” for the holes depth, mine finished shelf was 22” but yours may be different so you need to measure. Once you know your length, measure and cut your wood dowels to that length, you need 4. I used a razor blade to cut the dowels, they cut pretty easy just be extra careful. Now put a drop of wood glue in each hole and insert each wood dowel, as long as you didn’t tighten down the top you should be able to fit in the dowels in easily. Once all dowels are in place you can tighten down the top screws and your shelf is finished.


2 comments:
So cool! I too make doubles of most of the accessories I sell, so I know what you mean about the space issue. I especialy love how your storage solution doubles as a colorful, decorative piece!
Thanks! :o)
Post a Comment